Login as Administrator on Cafe Client computer in order to get access to the configuration setup panel.
To login as an Administrator use predefined username ADMIN and a blank password.
Setup
Most important of all is to set and configure Internet Cafe Client to communicate with the Internet Cafe Server.
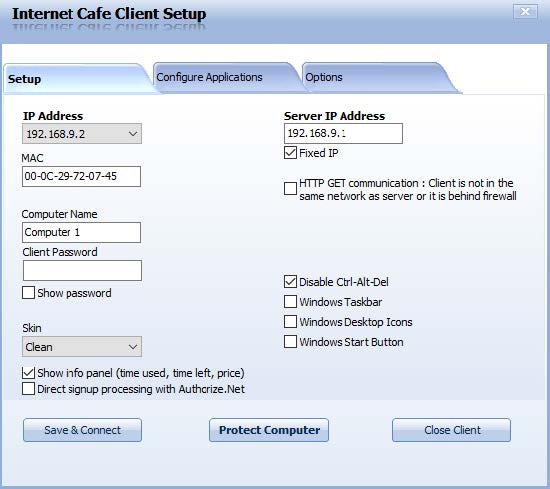
From Setup you can set following options:
• Computer Name – Displays computer name
• Client Password – Show Client computer admin password
• Show Password – Enable/Disable showing of the admin password
• Skin – Give you the ability to set Cafe Client specific Skin from other Clients on the network
• Show Info panel – Select this option to show Info Panel during computer usage with
information of time used, time left and price
• Direct signup processing with Authorize.Net – Enable this option if you need to use this specific payment gateway in the signup process
• Server IP Address – In case that Cafe Client doesn’t recognize Cafe Server IP address, you will need to set it manually here
• Fixed IP – Select Fixed IP address in case that you set static IP address for Cafe Server
• HTTP GET communication – Select HTTP GET if Cafe Server is using dynamic IP addresses or Cafe Server is not reachable even when TCP /IP is used as a communication method, but some firewall block communication
• Disable Ctrl+Alt+Del – Select this option to disable Task Manager (It is disabled by
default)
• Windows Taskbar – Select this option to show Windows Taskbar
• Windows Desktop Icons – Select it to show desktop icons
• Windows Start Button – Select to show Windows start menu button
• Save & Connect – Press on this button to Save settings and Connect Cafe Client to Cafe Server
• Protect Computer – Press on Protect Computer button to load Cafe Client protection mask
• Close Client – Press on Close Client computer button to stop Cafe Client software on the computer
Configure Applications
From Internet Cafe Client Configure Applications tab you can set specific application configuration for the Cafe Client computer.
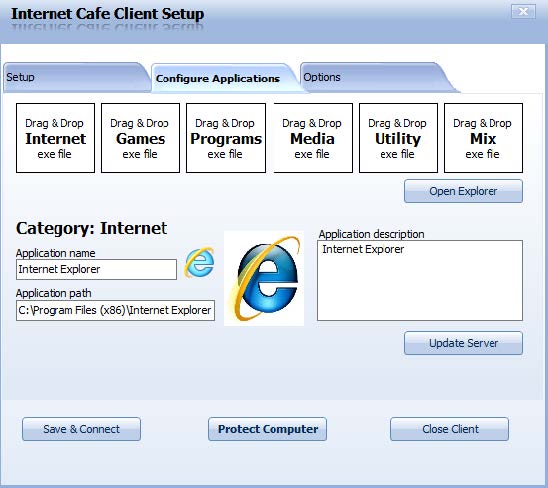
Such setup is recommended in the case when you have a different set of applications on client computers and you can not configure it automatically for all clients from Cafe Server.
To add new Application to the Cafe Client go to Configure Applications tab.
Press Open Explorer button and navigate to the installation folder of the application on your client computer.
Using Drag & Drop method pick your installation *.exe file and place it to desired Program Group in which you want to show that application later on Cafe Client. In the example, we used Internet Explorer.
As soon as you place Iexplore.exe to the Internet Program group, Cafe Client load information that application is added to Category: Internet.
As Application name is loaded Internet Explorer and as Application path is loaded Windows locations where it is located.
If you want to use Image for the application press Image button and navigate to the image which you want to use and set Application Description if you want to use some.
When the process is done, press Update Server, Save & Connect, and Protect Computer button. From Cafe Server Setup – Applications – Applications tab press on Save button and then the application will appear on the Internet Cafe Client.
Client Additional Options
From Cafe Client Options tab are available following set of options:
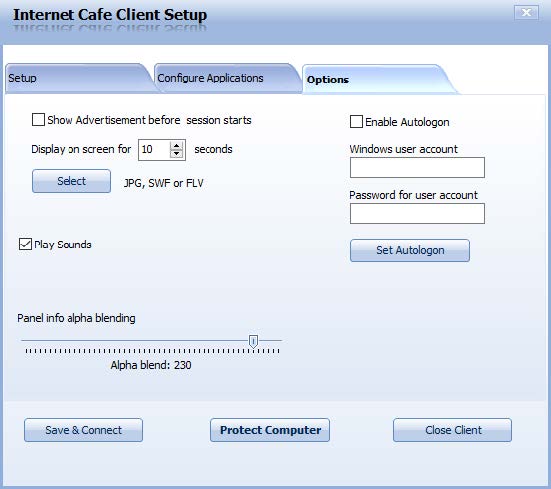
• Show Advertisement before session start – Load and show the advertisement on Cafe Client after session start
• Display on-screen for _ seconds – Set time interval for how long advertisement will be visible on the client
• Select – Press on Select button to navigate and select an advertisement
• Play Sounds – Select this option to p[lay sound messages on the Cafe Client
• Panel Info alpha blending – Set a value for Info Panel blending
• Enable Autologin – Enable autologin of the computer
• Windows user account – Set Windows User account username
• Password for a user account – Set Windows user account password
• Set autologin – Set Autologin with provided details